Not so long ago photography was a two-step process, and the physical act of snapping pictures with your camera was only the first half. The second half took place in darkrooms, where film was developed and prints of your pictures were made. Between the two years I spent on the yearbook and newspaper staff at Redlands, another year on the yearbook and newspaper staff at Southwestern Oklahoma State University, and interning at two different newspapers (the El Reno Tribune and the El Reno Light), I got to know my way around a darkroom pretty well.
Back in those days, you could take a good photograph and make it a great one in the darkroom. A good photograph is one that captures a a moment. The more things you get right when taking a picture, the easier it’ll be to work with in the darkroom. Things like making sure your subject is inside the frame, in focus, and lit properly can be pretty difficult (and sometimes impossible) to fix in the darkroom.
With the conversion from analog to digital photography, we lost the need to develop film and make prints and most of those darkrooms went away. Instead, we’ve replaced them with a new digital darkroom: namely, Photoshop.
Photoshop can’t fix everything. It can be pretty difficult to make a blurry photo “less blurry” or fix the colors of a back-lit portrait, but one thing that Photoshop is great at is framing and cropping photos.
Cropping and framing photos allows us to make a good photograph great. Aside from all the technical mumbo-jumbo like making sure your camera is in focus and the lighting is adequate, there are three simple rules that will help you take great photographs. The first is getting close. The second is the rule of thirds. The third is moving into the photograph. These are all very simple concepts to understand and utilize.
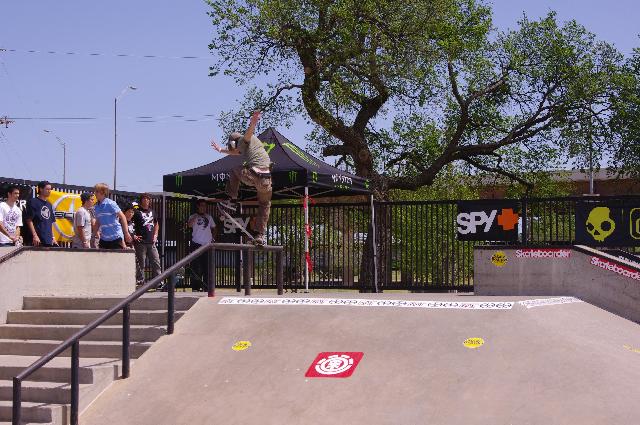
Before we begin, here’s an example of an okay (certainly not good or great) photograph:
By using our three new rules, hopefully we can turn this okay picture into a good (maybe even a great!) photo.
01. GETTING CLOSE
Although this picture is in focus and captures a moment, the biggest problem with it is the subject is too far away. In fact it’s so far away that on first glance it might be difficult to see where the action even is! The tree behind him completes for your eye’s attention, as does the red sticker on the ramp and the red “Spy” banner to his right. To improve this photograph, we need to make sure the subject of our photo (the skater) becomes the center of attention.
(Side note: I think the number one problem with most people’s pictures is that they don’t get close enough to their subjects.)
02. THE RULE OF THIRDS
Putting the subject of your photo dead center, unless you’re taking a close-up, can make things seem awkward and boring. Imagine, instead, a Tic-Tac-Toe-like grid in your viewfinder. Try to place the subject of your photo on the intersections where the lines cross.

(Where the green dots are.)
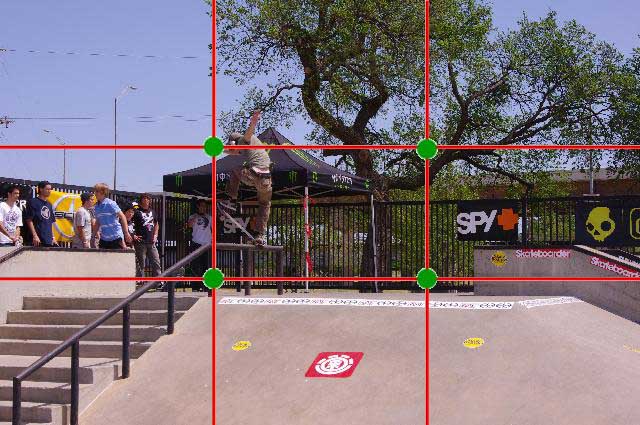
Although our skater is near one of the green dots,something still doesn’t feel right. Maybe it’s because it doesn’t follow the third rule, which is …
03. MOVING INTO THE PHOTOGRAPH
If your subject is moving, it makes more sense to have them moving “into” the photograph (toward the middle) rather than “out of” the photograph (away from the middle). Why? I don’t know. Perhaps our brains like to know where people are going.
Note that in my photo, even though the skater is near one of the green dots, he’s moving away from center.
Fortunately, all of these issues can be easily solved by cropping the photograph.
The massive amount of megapixels captured by today’s digital cameras lets us cheat a little when it comes to cropping. The original resolution of this picture was approximately 4,200 x 2,800. When I shrink them down for the web site, they’re 440 x 330. That means the original picture was nearly 10x as wide and 10x as tall as the original, or 100x bigger. That allows us to re-crop, re-size, and re-shape the original picture into a slightly more pleasing one without losing any resolution or detail. (In fact, we’re going to gain detail!)
Again, here is the old (original) picture:
Here is the new, re-cropped picture:
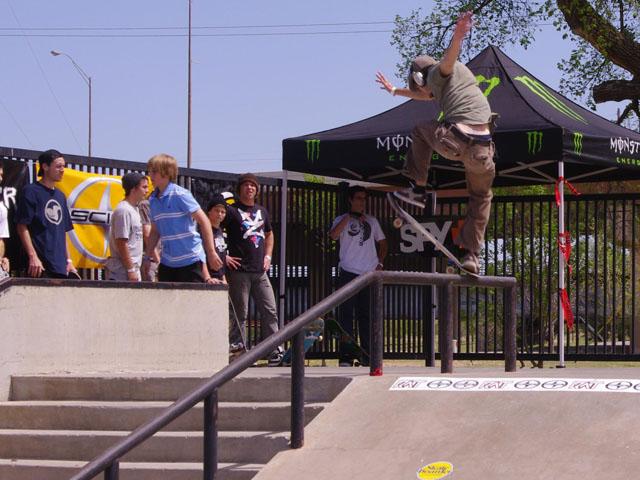
Note how the photo now uses all three tips I mentioned. 1, the subject is now larger and the center of attention. By zooming in and cropping out a lot of the dead space, I have drawn more attention to the skater and made him the focal point. 2, the action now takes place right in the middle of our “rule of thirds” intersection. 3, the skater is now moving toward the center of the photograph.
Cropping the photograph did a few other things for us as well. 1, I cropped out several of the brightly colored stickers, which I felt drew attention away from the subject. Most of the tree is gone too now. 2, by cropping out all the empty space from the right hand side of the photo, it now appears as if the crowd is larger than it really was. 3, the eye now has a nice line (the rail) that leads the viewer from the action (the skater) down to the corner of the photo. It creates an illusion of motion when your eyes follow it.
Here’s the newly cropped photo, with the rule-of-thirds overlay applied:

Cropping photos like this is simple. In Photoshop, I first create a blank picture the size I want the final picture to be. I then open the original and cut/paste it onto the blank. With the original there, I move and resize the original until it falls perfectly into the frame.
It’s not always possible to take the perfect photograph out in the wild. With just a little bit of nudging and cropping, you can bring more attention to your subjects and turn your good photographs into great ones!
Here’s a peeve that I see way too often: if you’re gonna get the exposure wrong with digital photography (hint: you are, shaddap) you should err toward slightly underexposed, or under-lit. Blown out hot spots don’t go away with Photoshop magic, but image editors are pretty forgiving with slightly dark pix. You can generally set a digital camera to slightly under expose with the EV setting even if your exposure is otherwise automatic.
I think you summed up everything I learned about photography in Journalism 336, but in a more succinct, easier to remember fashion. Thanks for the refresher.